Introducing the bCisive screen
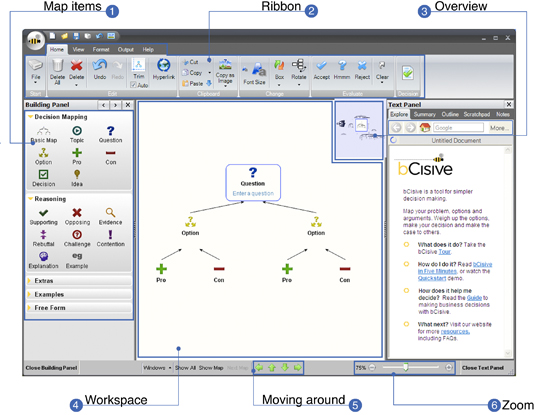
1. Map items
Drag and drop these map items onto the workspace to build your map. See the ‘Building a map’ section below for more tips on putting your map together.
2. Ribbon
The Ribbon gives you access to tools to enhance and work with your map. It’s organised into Home, View, Format, Output and Help areas, which are accessible by clicking on the tabs along the top of the Ribbon.
You can minimize the Ribbon by right-clicking anywhere on the Ribbon and selecting ‘Minimize the Ribbon’ from the menu. The Ribbon will appear temporarily when you click on a tab to access a tool, and then minimize again. When you want to restore the Ribbon permanently, double click on any Ribbon tab.
3. Overview
The overview is a thumbnail of the entire workspace, showing in white the area currently being displayed. Through the View ribbon, set the overview to appear always, never, or only if the workspace is too big to fit on the screen.
Drag the white display area within the overview to move around the workspace.
4. Workspace
The workspace is your blank slate for creating decision and grouping maps. It’s infinitely large, and can contain multiple maps.
5. Moving around
Use the arrows at the bottom of the screen to move around the workspace. You can also do this by clicking on any blank area of the workspace and dragging it. Alternatively, you can look at a different part of the workspace by relocating the display area window in the Overview in the top right corner of the workspace.
6. Zoom
Zoom in and out to control how much of the workspace you see, and how large or small your map appears.
Zooming does not affect the size of the map when it is output, either by printing or by copying as an image.
You can also zoom while working in the workspace by using the scroll wheel on your mouse. (In the Building Panel and Text Panel when a scroll bar is visible, the mouse’s scroll wheel scrolls the contents in the panel.)